
Summary
I calibrated BeidPrep's fibre material model on published tensile tests of glass-fibre PA6 and ran its exported OpenRadioss material card on a bar at each test angle. Calibrated from the 0°, 45° and 90° tests, BeidPrep's stiffness is within -7.8 % to +7.2 % of the test, its strength is never above the test (0 % to -25 %), and its bar breaks earlier than the test (by up to 48 % of the failure strain). Two results are on the unsafe side: calibrated from the 0° test alone, the heat-stabilised grades come out up to 29 % too stiff and up to 5 % too strong at 45° and 90°; and on a second data set, whose curves are true stress, the peak stress is 7 % to 33 % above the test, because BeidPrep reads every input curve as engineering stress.
The tests
Kurkin et al. 2024 (the curves on this page). E. Kurkin and co-authors tested four injection-moulded polyamide-6 grades with short glass fibres:
- PA6 with 15 % glass, heat-stabilised;
- PA6 with 30 % glass;
- PA6 with 30 % glass, heat-stabilised;
- PA6 with 50 % glass.
They cut tensile bars from 4 mm plates at 0°, 45° and 90° to the flow direction and published the stress-strain curves of each bundle of specimens (Applied Sciences 14 (2024) 11464, Fig. 9; open access, CC BY). I digitised the curves from the figure. The digitising error is ±0.3 to ±0.5 MPa in stress and ±0.016 % in strain or less. Where the paper shows several specimens, I compare with the middle one and show the others as a band.
Holmström et al. 2020 (numbers only). P. H. Holmström, O. S. Hopperstad and A. H. Clausen tested PA6 with 15 % and with 30 % short glass fibre at seven angles to the flow, 0° to 90° in 15° steps. They measured strain by digital image correlation and report true stress against logarithmic strain (Composites Part C 2 (2020) 100019, with a published data set). The data set's licence does not allow commercial reuse of the curves, so this page gives only my comparison figures, not the test curves.
How I compared
- Calibration. BeidPrep's own calibration ran on the published curves, through the same path the Fibre panel uses. It was not adjusted afterwards to make any curve fit. Two inputs were tried:
- the recommended one, three curves at 0°, 45° and 90° ("three-angle");
- the minimum one, the 0° curve alone with BeidPrep's fibre-orientation table ("one-angle"). In the one-angle runs, 45° and 90° are predictions.
- Model. BeidPrep exported its OpenRadioss material card, with fibre axes and element failure. I ran it in OpenRadioss on a uniform bar of hexahedral elements carrying the test plate's fibre state (skin and core layers), turned to the test angle.
- Outputs.
- Stress is the bar's reaction force over its area. For Holmström it is true stress, from the bar's own current width and thickness, to match the paper's measure.
- Strain is the bar's strain. For Holmström it is logarithmic.
- The three numbers.
- Stiffness is the slope over the same 0.2 %-wide strain window on both curves.
- Strength is the highest stress on each curve.
- Strain at failure is the test curve's last point, against the strain at which BeidPrep's bar breaks by element failure.
- Difference = (BeidPrep - test) / test × 100 %. Minus means BeidPrep is below the test, which is the safe side for strength and failure strain.
Results
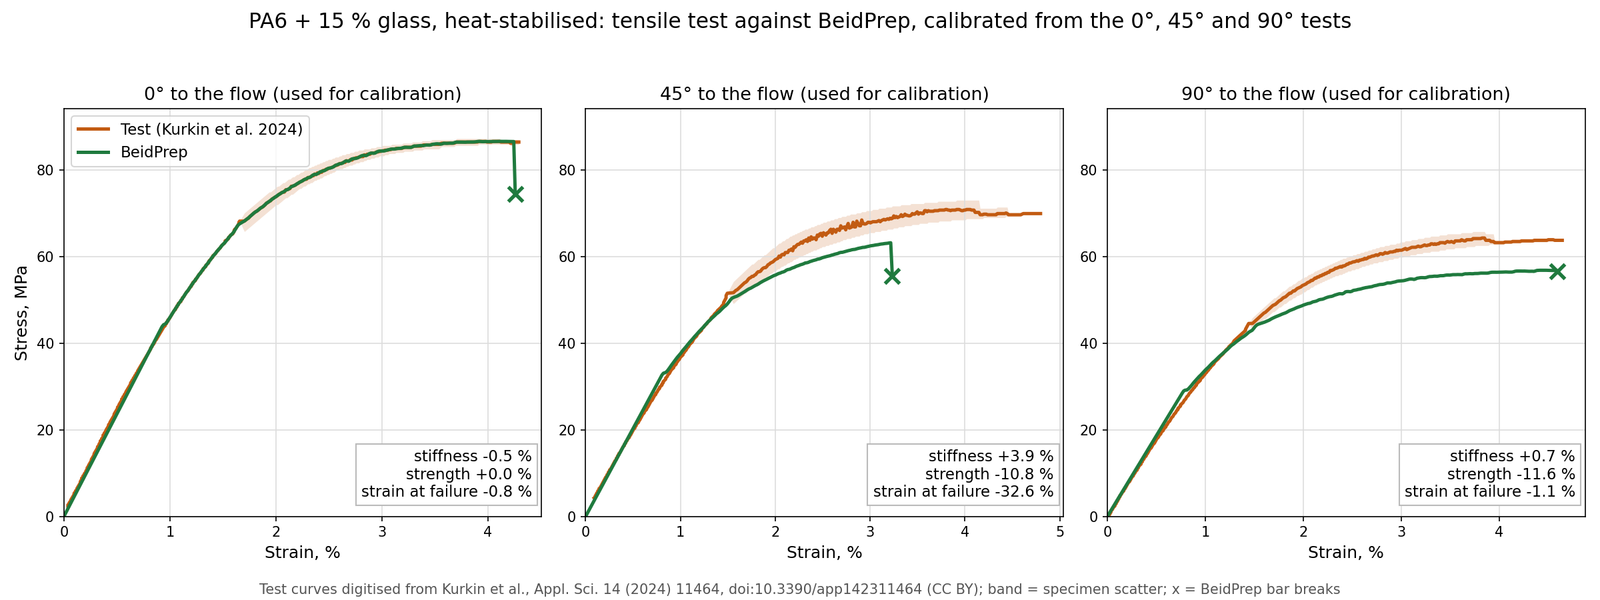
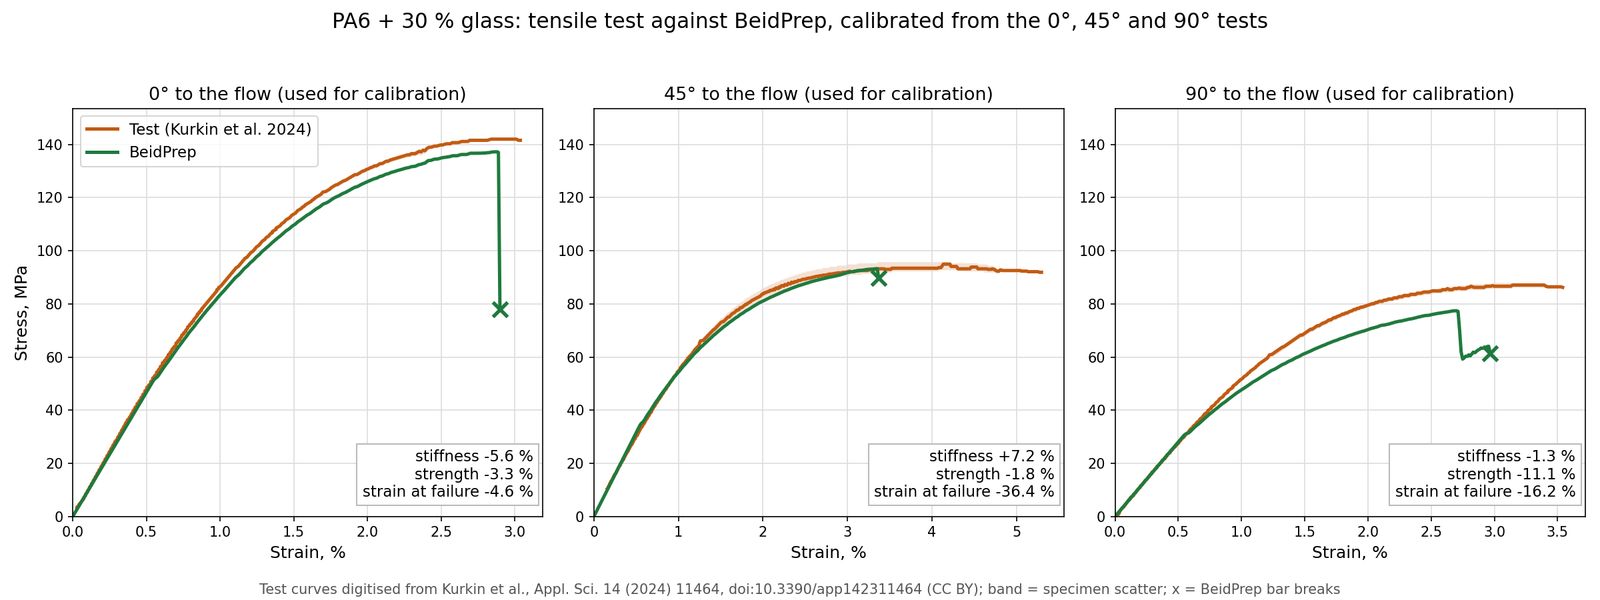
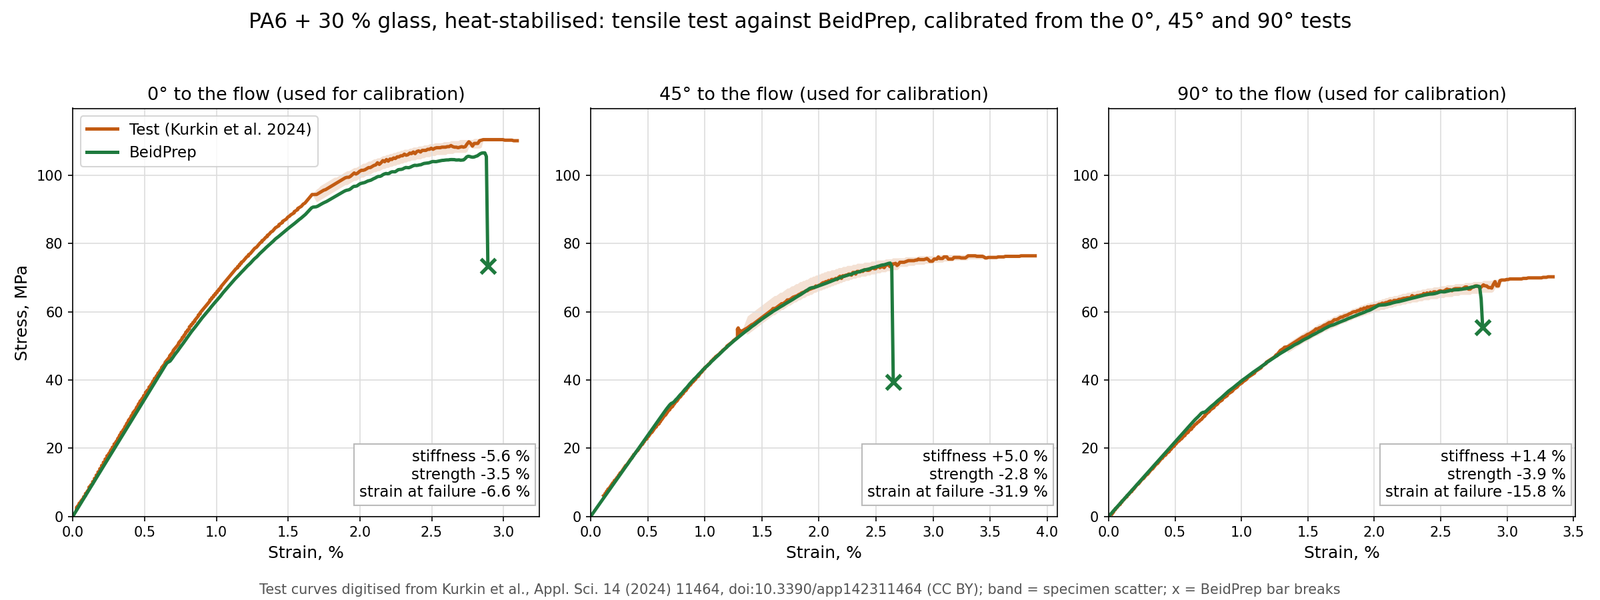
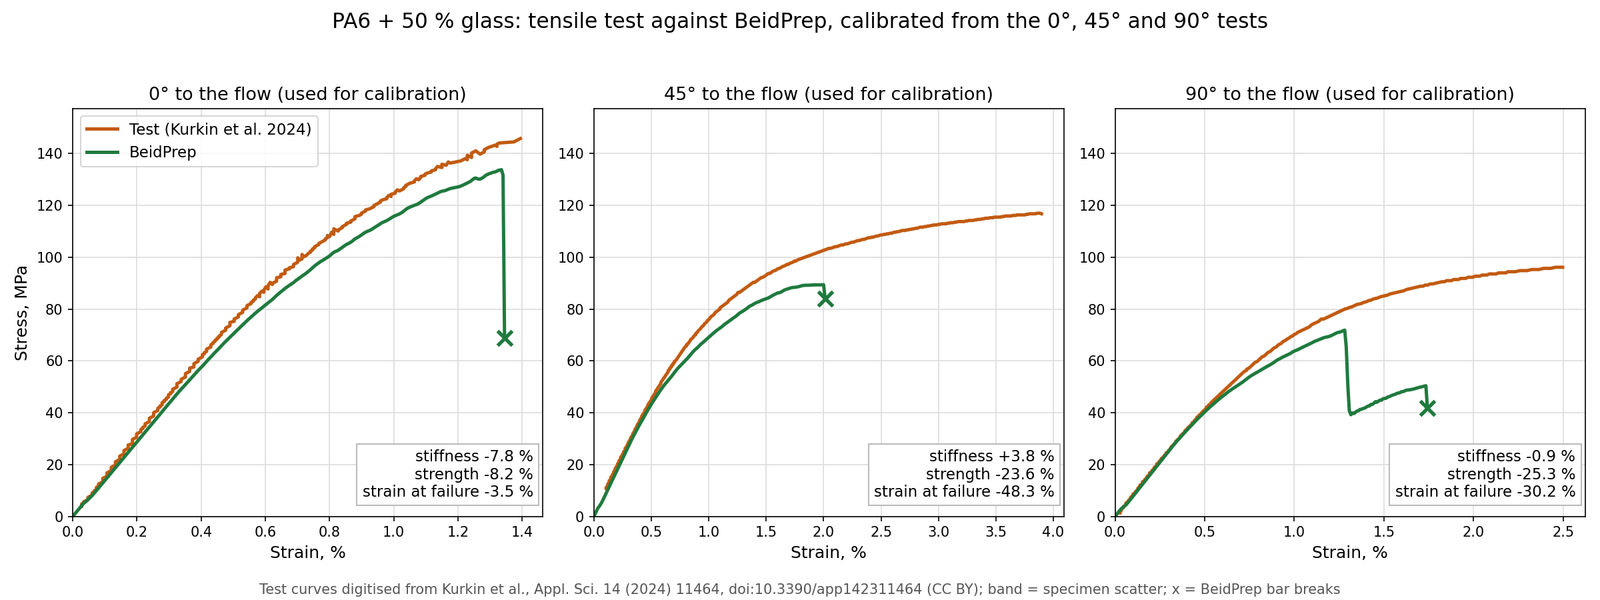
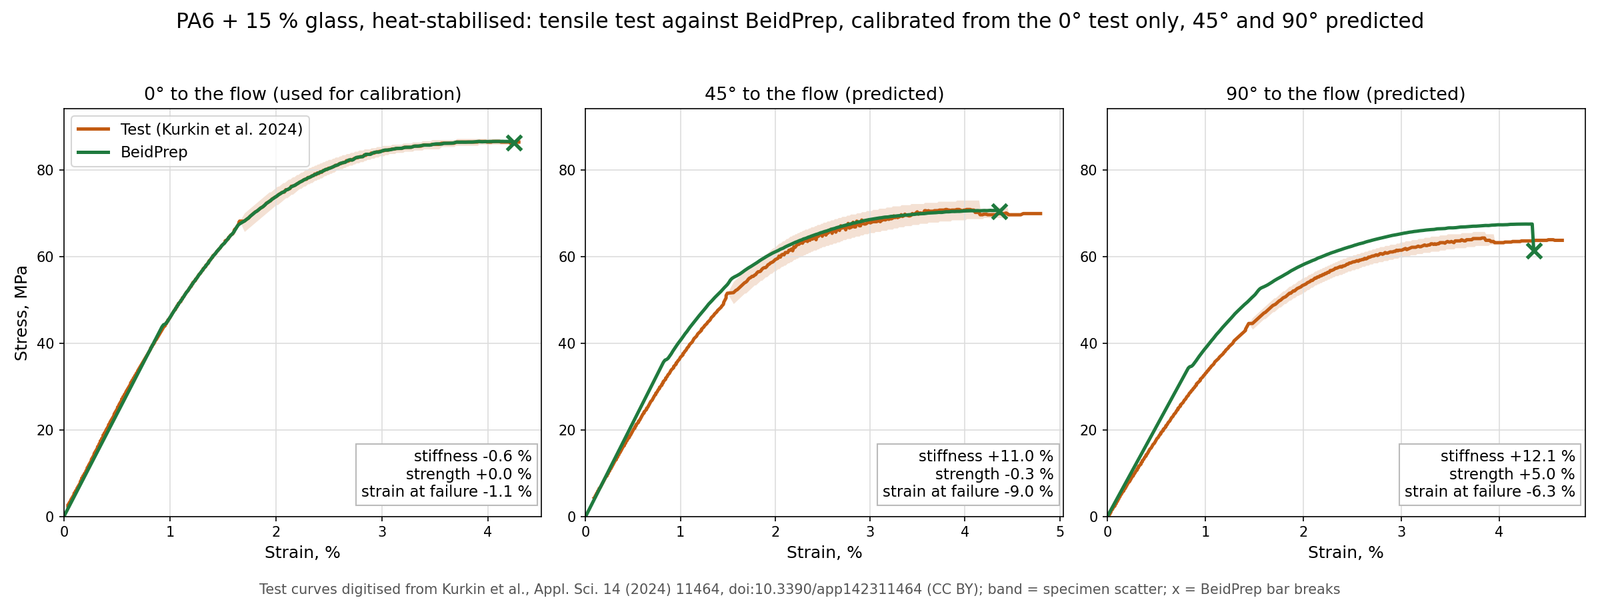
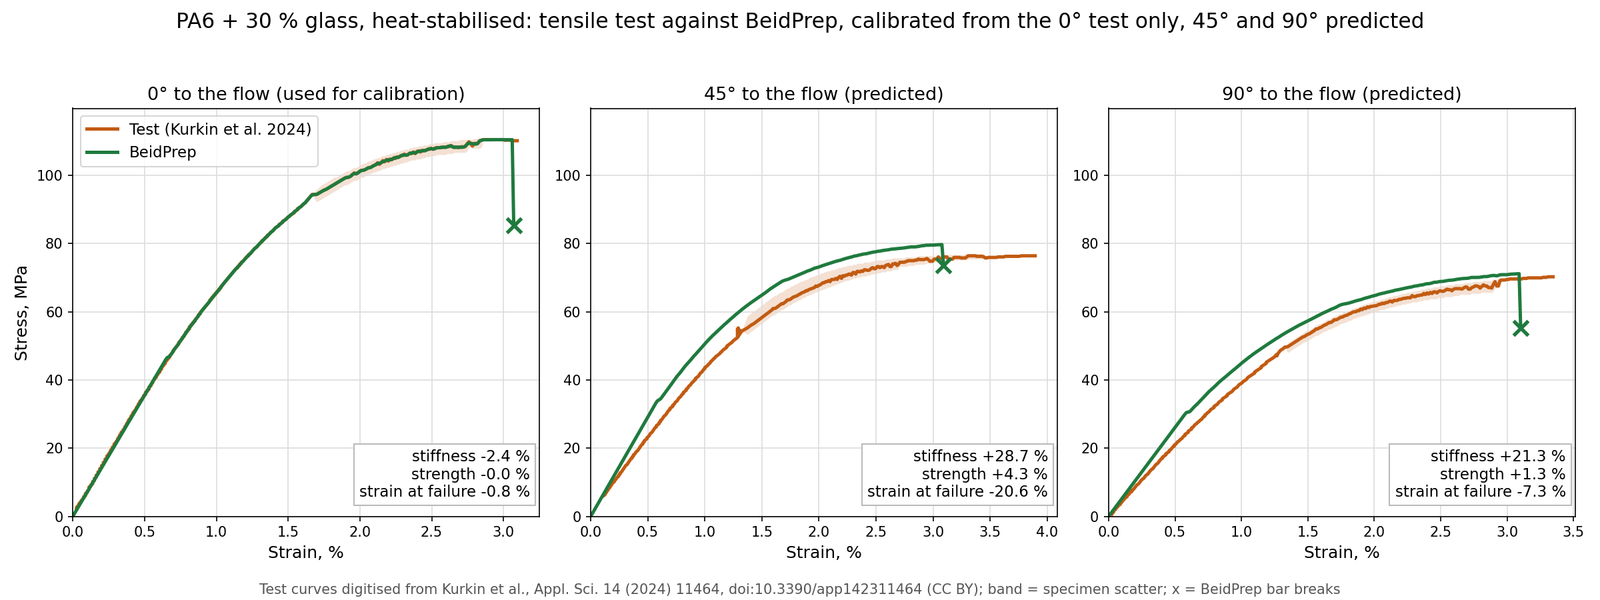
Kurkin et al. 2024, three-angle calibration
| Grade | Angle | Stiffness, MPa (test / BeidPrep / diff) | Strength, MPa (test / BeidPrep / diff) | Strain at failure, % (test / BeidPrep / diff) |
|---|---|---|---|---|
| PA6-GF15, heat-stab. | 0° | 4766 / 4744 / -0.5 % | 86.7 / 86.7 / +0.0 % | 4.29 / 4.26 / -0.8 % |
| PA6-GF15, heat-stab. | 45° | 3913 / 4064 / +3.9 % | 70.9 / 63.3 / -10.8 % | 4.80 / 3.23 / -32.6 % |
| PA6-GF15, heat-stab. | 90° | 3705 / 3732 / +0.7 % | 64.4 / 56.9 / -11.6 % | 4.64 / 4.59 / -1.1 % |
| PA6-GF30 | 0° | 9902 / 9345 / -5.6 % | 142.0 / 137.3 / -3.3 % | 3.04 / 2.90 / -4.6 % |
| PA6-GF30 | 45° | 5877 / 6302 / +7.2 % | 95.0 / 93.3 / -1.8 % | 5.30 / 3.37 / -36.4 % |
| PA6-GF30 | 90° | 5675 / 5599 / -1.3 % | 87.1 / 77.4 / -11.1 % | 3.54 / 2.97 / -16.2 % |
| PA6-GF30, heat-stab. | 0° | 7273 / 6865 / -5.6 % | 110.4 / 106.6 / -3.5 % | 3.10 / 2.89 / -6.6 % |
| PA6-GF30, heat-stab. | 45° | 4520 / 4745 / +5.0 % | 76.4 / 74.2 / -2.8 % | 3.89 / 2.65 / -31.9 % |
| PA6-GF30, heat-stab. | 90° | 4299 / 4362 / +1.4 % | 70.2 / 67.5 / -3.9 % | 3.35 / 2.82 / -15.8 % |
| PA6-GF50 | 0° | 16086 / 14835 / -7.8 % | 145.8 / 133.8 / -8.2 % | 1.39 / 1.34 / -3.5 % |
| PA6-GF50 | 45° | 8995 / 9335 / +3.8 % | 117.0 / 89.4 / -23.6 % | 3.90 / 2.01 / -48.3 % |
| PA6-GF50 | 90° | 8764 / 8690 / -0.9 % | 96.2 / 71.9 / -25.3 % | 2.50 / 1.74 / -30.2 % |
Kurkin et al. 2024, one-angle calibration, heat-stabilised grades
| Grade | Angle | Stiffness, MPa (test / BeidPrep / diff) | Strength, MPa (test / BeidPrep / diff) | Strain at failure, % (test / BeidPrep / diff) | Stress at 1 % strain, diff |
|---|---|---|---|---|---|
| PA6-GF15, heat-stab. | 0° (used) | 4766 / 4739 / -0.6 % | 86.7 / 86.7 / +0.0 % | 4.29 / 4.24 / -1.1 % | +0.0 % |
| PA6-GF15, heat-stab. | 45° (predicted) | 3913 / 4344 / +11.0 % | 70.9 / 70.8 / -0.3 % | 4.80 / 4.37 / -9.0 % | +10.6 % |
| PA6-GF15, heat-stab. | 90° (predicted) | 3705 / 4154 / +12.1 % | 64.4 / 67.6 / +5.0 % | 4.64 / 4.35 / -6.3 % | +17.6 % |
| PA6-GF30, heat-stab. | 0° (used) | 7273 / 7100 / -2.4 % | 110.4 / 110.4 / -0.0 % | 3.10 / 3.07 / -0.8 % | +0.0 % |
| PA6-GF30, heat-stab. | 45° (predicted) | 4520 / 5816 / +28.7 % | 76.4 / 79.7 / +4.3 % | 3.89 / 3.09 / -20.6 % | +16.0 % |
| PA6-GF30, heat-stab. | 90° (predicted) | 4299 / 5214 / +21.3 % | 70.2 / 71.1 / +1.3 % | 3.35 / 3.10 / -7.3 % | +14.9 % |
Holmström et al. 2020, three-angle calibration (difference only)
Strength here is the highest true stress.
| Grade | Angle | Role | Stiffness diff | Strength diff | Strain at failure diff |
|---|---|---|---|---|---|
| PA6-GF15 | 0° | calibration | +0.6 % | +20.8 % | -8.7 % |
| PA6-GF15 | 15° | predicted | -0.5 % | +19.6 % | -11.1 % |
| PA6-GF15 | 30° | predicted | +0.8 % | +18.2 % | -29.7 % |
| PA6-GF15 | 45° | calibration | +0.4 % | +19.1 % | -35.9 % |
| PA6-GF15 | 60° | predicted | +5.2 % | +23.2 % | -29.5 % |
| PA6-GF15 | 75° | predicted | +2.5 % | +28.7 % | -12.1 % |
| PA6-GF15 | 90° | calibration | +0.6 % | +32.5 % | -9.9 % |
| PA6-GF30 | 0° | calibration | +0.1 % | +7.5 % | -9.7 % |
| PA6-GF30 | 15° | predicted | -2.7 % | +7.4 % | -14.7 % |
| PA6-GF30 | 30° | predicted | +2.3 % | +7.4 % | -17.1 % |
| PA6-GF30 | 45° | calibration | -1.0 % | +9.0 % | -41.3 % |
| PA6-GF30 | 60° | predicted | -1.5 % | +7.8 % | -35.7 % |
| PA6-GF30 | 75° | predicted | -0.9 % | +9.2 % | -29.5 % |
| PA6-GF30 | 90° | calibration | -0.2 % | +8.6 % | -26.6 % |
Where BeidPrep is off, by how much, and why
- It breaks early (safe side). The bar's failure strain is 0.8 % to 48 % below the test. The worst case is PA6-GF50 at 45°: 2.01 % against 3.90 %. The bar models the plate's skin and core layers. Under load the core is in a multi-axial stress state, and the failure rule allows less strain there, so the core fails first and the bar breaks before the test does. A bar made of skin alone breaks exactly at the rule's strain.
- Strength is low at 45° and 90° (safe side), up to 25 %. The worst cases are PA6-GF50 at 90° (-25.3 %) and at 45° (-23.6 %), and PA6-GF15 heat-stabilised at 90° (-11.6 %). There are two causes:
- the early break above;
- the solver card carries one hardening curve, from the 0° test, for every direction, so past yield the stress at other angles can be off by up to about ±12 % at 3 % strain.
- Slightly soft along the flow (safe side), up to 8 %. The stiffness at 0° is -5.6 % to -7.8 % for PA6-GF30, PA6-GF30 heat-stabilised and PA6-GF50. By default BeidPrep limits the fitted fibre alignment to the most aligned layer of its Moldflow reference plate (0.819 for 30 % glass, 0.825 for 50 %). Where the fit is more aligned than that, the bar is a little softer along the flow than the test.
- UNSAFE: heat-stabilised grades calibrated from the 0° test alone. At 45° and 90°, BeidPrep is:
- 11 % to 29 % too stiff;
- 10.6 % to 17.6 % too high in stress at 1 % strain;
- up to 5.0 % too strong (PA6-GF15 heat-stabilised at 90°).
The cause: from one curve, BeidPrep holds the matrix at its database stiffness. A heat-stabilised grade's matrix is softer than that, so the fit compensates with short fibres, and off-axis comes out too stiff and too strong. BeidPrep warns when it sees this case. Calibrating from three angles removes it: the same grades then come within 5 % in stiffness at 45° and 90° and are never above the test in strength.
- UNSAFE when the input curve is true stress: peak stress 7 % to 33 % too high on the Holmström data set. BeidPrep reads the tensile curve you give it as engineering stress (force over the original cross-section). Holmström's curves are true stress, so the solver material comes out too strong past yield, by about the strain itself. Up to 3 % strain BeidPrep is within -5 % to +8 % of the test at every angle. For PA6-GF15 at 0° it is +5 % at 5 % strain, +16 % at 12 % and +23 % at 16 %. The peak is +18 % to +33 % for PA6-GF15, which runs to about 20 % strain, and +7 % to +9 % for PA6-GF30, which breaks at 6 % to 14 % strain. I confirmed the cause on all 45 bars. Reading the input as true stress brings the Holmström 0° peaks within 2.2 % of the test, but the Kurkin bars at 0°, whose curves are engineering stress, then lose 1.0 to 3.4 points of peak stress against their test. The Kurkin results on this page use engineering-stress input and are not affected. Until BeidPrep asks which measure your curve is in, give it engineering stress-strain data, or convert a true-stress curve first: engineering strain = e^(true strain) − 1, engineering stress = true stress / e^(true strain).
Limits
- One hardening curve. The solver card carries one hardening curve, from the 0° test, for every direction. Past yield, the stress at other angles can be off by up to about ±12 % at 3 % strain, below the test as well as above it. Per-direction hardening comes after the beta.
- Alignment cap. The fitted alignment is limited to the most aligned layer of the Moldflow reference plate. This keeps thin, highly aligned regions from being over-predicted, at the cost of a slightly soft bar along the flow.
- One-curve calibration of a soft-matrix grade can be too stiff and too strong off-axis (see above). Use three angles where you have them.
- Input stress measure. BeidPrep reads every input curve as engineering stress. A true-stress curve makes the material too strong past yield, by about the strain (see above).
- Bars only. These are uniaxial bars with the test plate's fibre state. A real part's orientation comes from your Moldflow result through BeidPrep's mapping, and this page does not test that mapping.
- Not covered:
- other temperatures than about 23 °C, moisture states other than the source's, strain rate, compression, shear, fatigue and creep;
- the strength of weld lines (BeidPrep only shows them);
- carbon-fibre, long-glass-fibre and PPA grades, which the beta refuses.
References
- E. Kurkin et al., Short-Glass-Fiber Aspect Ratios in Polyamide-6 Composites: Homogenization and Deep Learning-Based Scanning Image-Microscope Segmentation Comparison, Applied Sciences 14 (2024) 11464. doi:10.3390/app142311464. CC BY.
- P. H. Holmström, O. S. Hopperstad, A. H. Clausen, Anisotropic tensile behaviour of short glass-fibre reinforced polyamide-6, Composites Part C 2 (2020) 100019. doi:10.1016/j.jcomc.2020.100019. Data set: doi:10.17632/v6jxkjtrt3.1.